Jewelry ShopTheTrade Industry


A Wholesale Body Jewelry Shop should have certain basic qualities and trust factors to be able to win the confidence of the customers with its policies. As a customer, what you would want first would be quality.
As a piercing jewelry remains directly attached to your body, and in most case through raw flesh or skin, it is essential for the jewelry material to be made of good quality material. The next thing that matters is the delivery process, for this is how you will get your orders. If the delivery process is slow or unreliable, the whole experience might become a mess, and you might as well lose confidence from online shopping.
As for the metals or materials of the body piercing jewelry, make sure that you do not buy anything that is made in nickel, for it is a highly harmful metal as far as body jewelry is concerned.
The reliable metals are usually gold, silver, titanium, platinum. Other than these, there are variations of materials, like wood, stone, anodized jewelry in black or gold. Anodizing means to put thick layers of the anodizing metal over the base metal, this gives not just a sophisticated look but also makes the polish stay for a long time.

Making a Beaded Bezel Tutorial

So, you've been practicing your even count peyote stitch, right? Because in this tutorial, I'm going to go over a few basic materials and then show you how to use some easy bead embroidery techniques to make a beaded bezel for a (handmade) cabochon.

The first thing that you'll need is a cabochon (preferably handmade!), glue, some cylinder beads, a piece of bead embroidery backing or medium, some beading thread, and a beading needle. I have a few recommendations for each of these:
  • Cylinder Beads - I always recommend stitching a peyote bezel with cylinder beads, since they are relatively uniform in shape and size. Size 11 works best for this technique, but if you're really nuts, you can use a smaller size 15.
  • Bead Embroidery Medium - This is what you will glue your cabochon to. I prefer to use Lacy's Stiff Stuff because it's easy to stitch through, easy to cut, and can be dyed any color you like using regular fabric dye. There is also an alternative bead embroidery foundation that is very similar to Lacy's (but much less expensive) available from Sova Enterprises.
  • Beading Thread - While I love stiffer threads like FireLine and WildFire for most other beadwork, I still prefer to use a softer nylon thread for bead embroidery. My favorites are Nymo and S-Lon - they are inexpensive, come in a huge range of colors, and are widely available at bead shops and online.
  • Glue - What kind of glue you use doesn't really matter, since you will be stitching a very secure bezel around your cabochon. But to hold your cabochon in place while you stitch, I prefer E-6000. Always make sure that you follow the package directions when using glues!
  • Beading Needle - Size 12 beading needles work the best for bead embroidery. You can either use a longer 2" needle, or a shorter or "sharps" needle. Whatever is more comfortable for you is the best thing to use, but make sure it's a beading needle - beading needles were designed to fit through tiny seed beads several times without breaking the needle or the bead.
Now that you have everything you need, let's start stitching!

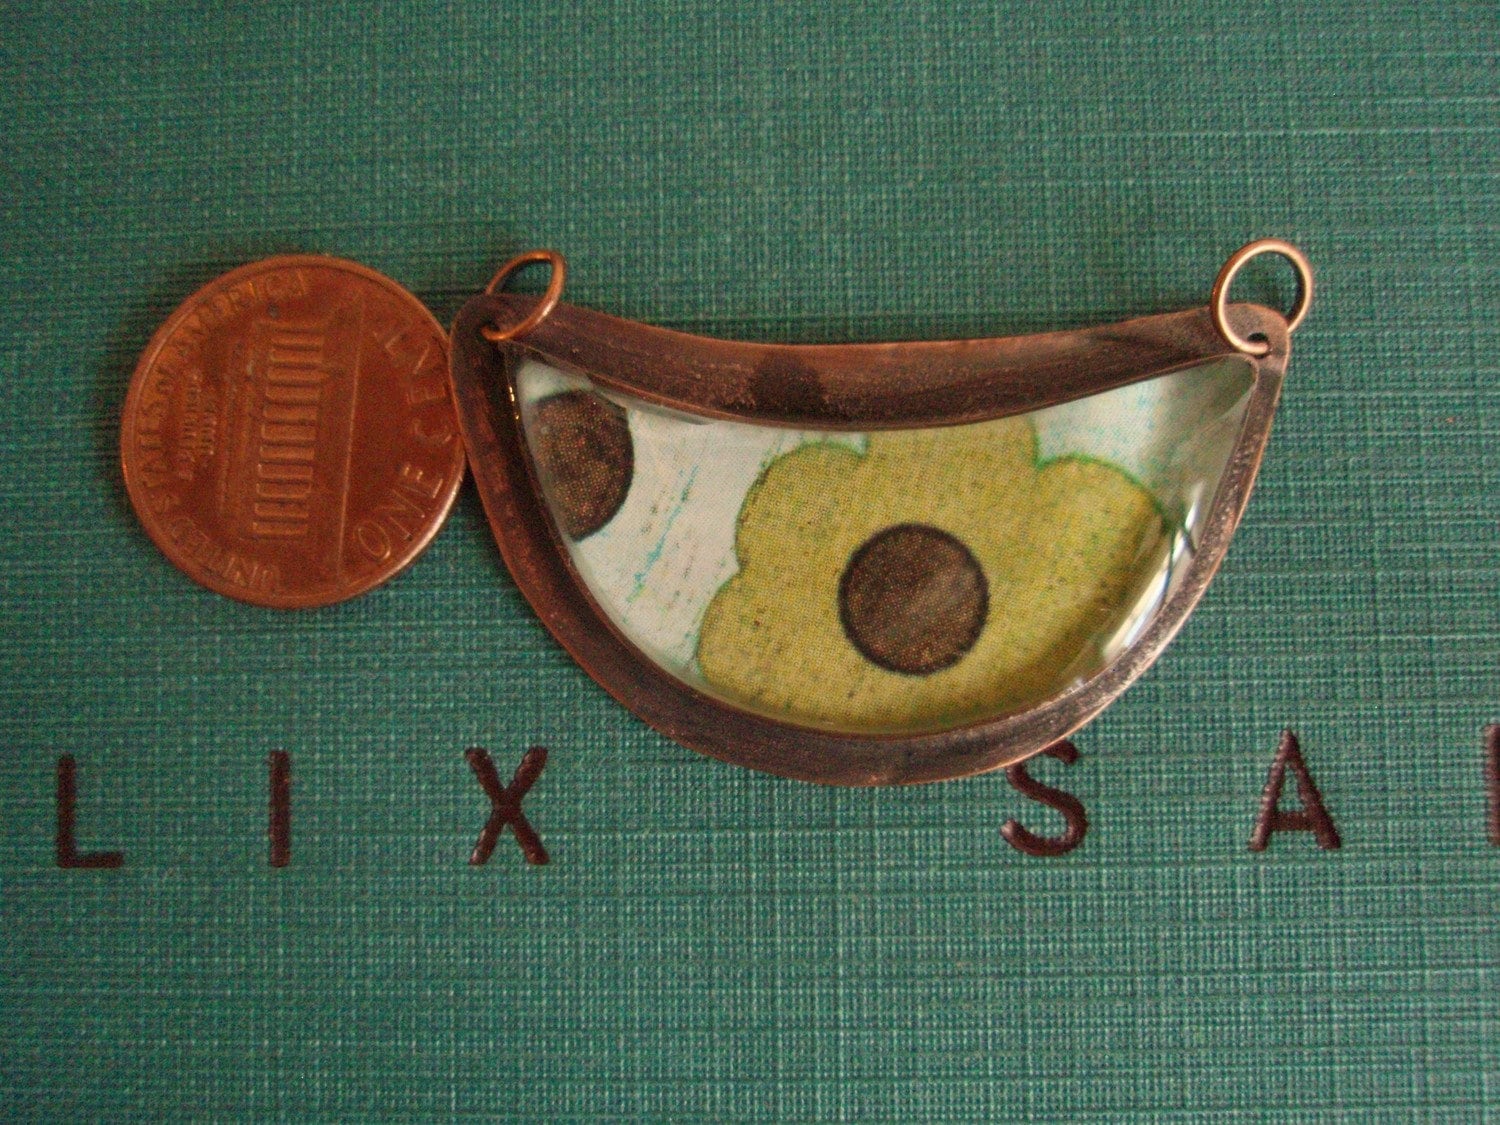
1. Glue the cabochon to the bead embroidery medium. Use a toothpick and spread a thin layer of glue evenly on the back of your cabochon. Firmly press the cabochon onto the bead embroidery medium and wipe away any glue that oozes out from under the edge with a toothpick or a tissue. Allow one hour for the glue to dry completely. At this point, you might want to trim down the piece of bead embroidery medium to a more manageable size. I usually leave anywhere from 1 to 4 inches around the cabochon to give myself room to add more rows of bead embroidery.


2. Basic Beaded Backstitch. To do basic beaded backstitch:
  • Cut a comfortable length of beading thread, and tie a small knot about 1 inch from the end. Pass the needle up through the bead embroidery medium near the edge of the cabochon.
  • Pick up 2 cylinder beads and push them down against the embroidery medium. Pull on your thread a little bit, and pass your needle down through the embroidery medium at the edge of the second cylinder bead.
  • Flip your embroidery medium over and look at the back. Estimate the point between the two beads you just added, and pass your needle back up through the embroidery medium at that point. You should come up between the two beads. (Or roughly near that spot.)
  • Finally, pass your needle through the second bead you added and pull snugly.


3. Continue to add more beads. Using the basic beaded backstitch, add a ring of beads all around the cabochon, but make sure that there are an even number of beads surrounding the cabochon. If you need to squeeze in an extra bead to make it an even number, you're better off having a few extra beads than having too few. Once the ring of beads is finished, pass your needle through the very first bead you added.


4. Start stitching in peyote stitch. Now you'll use those even count peyote stitch basics! Pick up a bead, skip the next bead in the ring, and pass through the next bead. Pull snugly so that the beads line up on top of each other. Continue to do this all the way around the ring.


5. Making the step up. When working in tubular even count peyote for this bezel, after you've added all your beads for the first round, it will look like you don't have anywhere left to go. At this point, you'll make the "step up" by passing your needle through the first beaded you added at the beginning of the round. As you get more confident with each round, DON'T try to add the last bead and make the step up at the same time - you'll most likely end up piercing your beading thread with your needle and you'll create a weak spot in your bezel.


6. Stitching the rest of the bezel. How many rows you need to finish the bezel depends on how tall the cabochon is. For a cabochon with a straight edge, you will probably need five or 6 rows. For a domed (rounded) cabochon, you may only need three or four rows. A good rule of thumb is that once your bezel starts to curl inward around your cabochon, you are probably done.

7. Add an extra row of smaller seed beads for security. For the very last row of your bezel, use size 15 seed beads and pull snugly with each stitch. This will give your bezel a little extra security around the cabochon. You can also use beads of a contrasting color to add a little extra "pop" to your beaded bezel!


To finish your cabochon, you can add one or more rows of bead embroidery (beaded backstitch) around the bezel. You can get as fancy as you want, or just add a single row of larger (size 8 or 6) seed beads. Again, play with colors to see what you like. You can use colors in the same family, or use something wildly different for visual interest. For this piece, I decided to add a row of Picture Jasper rounds that picked up some of the colors in the handmade Lisa Peters Art ceramic cabochon.


I hope you've enjoyed this tutorial! This is a sneak peek from the book I'm working on, to be self-published, that will be all about turning handmade cabochons into beautiful, personal beaded jewelry. (I still need a good title, so if anyone has any suggestions, let me know!)

Next week, I'll show you how to add a backing to your cabochon to turn it into a pendant, brooch or bracelet. And if you're really interested in bead embroidery, make sure you enter our giveaway to win a copy of bead embroidery master Sherry Serafini's newest book, "Sensational Bead Embroidery". Happy beading!

My Creative Space


I got my supplies to make my Artbeads.com Design Partner challenge yesterday...I am so excited! I plan on toiling over this piece over the weekend...hubby is in Oklahoma till Sunday visiting his daughter.

I was planning on a Miriam Haskell-type design...her work is so exquisite!

The frosted acrylic flowers look good enough to eat...


and the frosty fire polish beads are just too sweet in this light baby pink...although in this picture they have a grey cast I could not get rid of!


Unfortunately, I'm on the bottom of the list for emails with the design challenge, so by the time I get to pick out my parts, many in the theme are sold out :( I wanted to go for vintage type accent beads in pink, blue and green. They needed to be oval shape and about 8mm to fit with the design. This was the best I could do with what was not sold out in their inventory...


There was no plain pink or green. The blue beads in the back are about the best choice. I liked the vintage shape of the pink/green beads, but the green throws it all off. I just may have to search my vintage bead stash to see if I can substitute. If you go back to the top picture, you can see how they just don't blend well. Perhaps I can use them to work up some earrings.

I'll get the pictures of the final piece up when it is done. Maybe I will even do a giveaway with the earrings!

Stay tuned.....

Egyptian Coil Free Tutorial from Marie Cristine

Aside from Chainmaille, Egyptian coil is one of the wire work techniques in jewelry making that I admire. It’s not that difficult to make and with only around, I think, seven simple steps, you’ll be able to create beautiful pieces.


Here's an earring using Egyptian Coil Technique from Wellspring Creations.

It's a simple one, that even without embellishment or some sort, just the coil itself, already looks beautiful.


You can also add charms or beads to add character like this Egyptian Coil & Turquoise Earrings from All A Glow Jewelry


...and creating Egyptian links, you'll be able to create a necklace or a bracelet like this shimmery bracelet from CatinaLife Creations.


What a beauty...can't help but admire these beauties. I think Egyptian Coil is a versatile wire work jewelry technique and I would love to include it in my list of favorite jewelry techniques. ^_^
And to help everyone with this technique, I found a free tutorial created by Marie of Marie Cristine blog. She has created an easy step by step instructions. And as I've mentioned earlier, with only seven simple steps you'll be able to master it.


So, get ready with your round nose pliers and your wire, and find out more with this
free tutorial from Marie.


Here's an added bonus!!! For your Egyptian Coil bracelet, you can finish it off by making an Egyptian Clasp. Learn how to with Kate Drew-Wilkinson at DIYLessons. Click the links for
Part 1 and Part 2


The Interesting Pea Pod

Hello Handmade Jewelry Club readers! It’s been a busy day for me and so I’m going to take it slow for today. I would like you to join me watch this free polymer clay video tutorials on Kawaii Charms fromKriquit. I promise you, they’re really cute!!!

You’ll have fun watching. ^_^

Now, did you notice the pea pod? It’s really easy to make, isn’t it?


Here’s another pea pod from Cathe Holden.


Did you notice the difference? If not, then head over to Just Something I Made and you’ll discover how interesting Cathe came up with her pea pod pendant.

You’ll be amazed just like I was. ^o^


And since we're featuring pendants and charms, here, you'll find more about Pendant Bail Basics.Watch Karla of Auntie's Beads as she gives you more tips and how-tos.


Download lots of free jewelry making tutorials at DiyLessons! Are you a jewelry (jewellery) making teacher/ tutor? You can also list your tutorials here too.Don't miss a post! Subscribe to Handmade Jewelry Club by Email FREEBookmark and Share

Felt jewelries for kids, teens and ladies

Hello Handmade Jewelry Club readers! I found four great jewelry pieces made of felt. Rebecca, Lisa, Bea and The Craftivist have made cool designs for earrings, bracelet and necklaces for girls of all ages.

Just a trivia, felt is an interesting material made of wool fibres, matted, condensed and pressed. Felt has many uses. One common use of felt is for a car that is used to protect the hood. Sometimes it’s called car bra or car mask. Another common use of felt is for making puppets and fedoras. There are also tough felts that can be used for construction materials. Nowadays, felt is also used in making accessories and I’m going to show you these four great tutorials, and get some good tips on how to make your own felt jewelries.


First let’s make one for the kids by turning your child’s doodles into a felt bracelet.


This is a great bonding time with the family. You can have your kids personalize their bracelet with their favorite characters sewn on the felt. Try it out with your kids and follow this free tutorial fromLisa of 5 Orange Potatoes.


This next piece would be for the teens.


Really cool! Yeah!!!

The Crafitivist has made the skulls look cute and funny J Felts are easy to cut and so you can create whatever shape or character you like. Funky teens would find this Friendly Neighborhood Skully Necklace cool to wear. Visit The Crafitivist Shakedown blog and get more ideas on how to make the skully necklace.


Now, these two would be great for the ladies.


Felt Flower Necklace

You can try and make your flowers bigger, or smaller, or how many you would want. Just follow thefree tutorial from Curios Bea’s Blog.


Anthropoligie Copy Cat Earrings

I really love this one from Rebecca. She did a really good job creating the earrings. Follow her free tutorial and find out how she made the earrings. It’s really cool how!


Buttoned Choker

This is a choker made from round leather cords with a flower button that serves as the focal bead.


Click here to buy now!


Download lots of free jewelry making tutorials at DiyLessons! Are you a jewelry (jewellery) making teacher/ tutor? You can also list your tutorials here too.Don't miss a post! Subscribe to Handmade Jewelry Club by Email FREEBookmark and Share

Awareness Ribbon Pin


Click here to buy now!


This brick-stitched version of the popular ribbon pin was inspired by Kerrie's mother, who is currently undergoing treatment for breast cancer. Change the color of the ribbon to match the cause.

Autumn Pearl Cuff


Click here to buy now!

Once you get the frame done, the rest is free form stringing and wrapping with wire. This intermediate project includes step-by-step photographs.


Project Details
Required Materials: Wire, pearls, focal beads, seed beads, dragonfly charms. See project for complete list.
Tools Needed: Bracelet mandrel. See project for complete list.
Techniques Used: Wirework
Originally Published: Step by Step Wire Jewelry, Winter 2008


Click here to buy now!


Download lots of free jewelry making tutorials at DiyLessons! Are you a jewelry (jewellery) making teacher/ tutor? You can also list your tutorials here too.Don't miss a post! Subscribe to Handmade Jewelry Club by Email FREE

My Kumihimo Bracelet and Keychain

Hello everyone! I’d like to show you something I made last week using the art of ancient Japanese braiding called Kumihimo. But before that, just a trivia, in ancient times, Kumihimo was created by finger-loop braiding and no tool was used. Japanese patiently use their skills in braiding with their bare hands. Then later on Marudai and Takadai were invented to make complex braiding much faster.


Marudai from Wikipedia


Takadai from Wikipedia


Nowadays, Kumihimo disks are made of foam plastic that’s, sort of, a portable Marudai - small and easy to carry anywhere. And because the modern Kumihimo disk is convenient to carry, I was able to finish my braided bracelet and keychain, halfway while traveling to visit a relative last week.


And here they are!!!


Originally, I wanted to take pictures and show everyone the steps of braiding but was not able to take photos. I was traveling when I did the keychain. Besides, as you can see, my photos weren't that clear. But I did found some pretty good video tutorials from craftycrafter and uploaded them on DIYLessons for everyone's benefit.


There's a video that will teach you the basics of Kumihimo braiding and this is good for starters. I also found a video on braiding with beads showing a very beautiful necklace. You can also learn onhow to finish Kumihimo braids with Cord End caps, which is so helpful in making jewelries and having that neat finish. And there's a video that shares helpful tips to determine where you to resume after a pause 'cause sometimes we need to stop and do something else and we get confused on what thread we stopped.

I recommend these videos. They're great!


Here's a necklace from craftycrafter. It uses the basic 8-strand braid added with beads.


Beautiful, isn't it?


So, let's get started and learn the basic with this
free video from craftycrafter on DIYLessons.


Social Networking Karma - Your Responses

I have a lot more I'd like to talk about with Social Networking Karma - but your responses to the first post were so wonderful that I need to dedicate this post to you guys and what you said! So from the mouth of my readers:


Dr. Suess Hair Clips

"I absolutely believe in it!! Thats why I do http://dailyhandmadepicks.blogspot.com to feature a cool artisan every day!!! Self promotion does NOTHING if you don't reciprocate! :)" ~ MamasLittleMonkeys


Carnival - Bead Embroidered Cuff

"Your comments are right on. When I opened your ArtFire message this morning that you had featured my cuff, I was delightfully surprised. I've been in a slump lately thinking my work will never be good enough to be noticed and now you've given me a little ray of hope. Thank you so much!" ~ beadsandblooms


Sierra Earrings

"I always feature 4 or 5 artists every Friday on my blog and it's so fun getting the responses from them and my readers too!" ~ Beaded Tail

I just want to finish up with a big thank you to everyone for all the comments you leave on my blog! I've been having a lot of fun working on building traffic to my blog and I really appreciate each and everyone of you who visit and join the discussion :)


fear and resin

mary jane dodd


'play is the beginning of knowledge.'
~ unknown

just like you, i would often cringe at the thought of trying something new... the past two years have brought a change in that thinking though... in the scope of life's experiences, trying something new here pales in comparison to some of the things that we might have to adapt to...

and so as serious as i am about my work, i try to view my new ventures as play... experimentation... in fact, in the times of greatest chaos in my life, i will often leap towards a new technique or medium to try... it is grounding, makes me feel alive and is confidence building if for only having done something unknown...

resin is fun! do i groan because i like to be able to use most of the 1/2 ounce? yes... so i try to have lots of things to do with it when i sit down... if i am making paper drops or paddles, i want to have a lot of them - i despise throwing out unused product (that is how i hold myself up)...


if i do a big batch i also have pieces ready to work with in the future - which is nice...


this is the perfect medium if you love paper, words, old books...

a 'dr. seuss' challenge inspired this piece:


a calder challenge pushed me to try tinting it because i wanted to be able to evoke the colors and movement found in his 'blue feather' stabile...


you can fill pre made bezels or make them yourself... what i absolutely love about this product is how much you can do with it... make it shiny and colorful, use it with patterned papers, try it in molds...

here are some examples i found on etsy...

lil smile pendant by jade scott

drops of color earrings by ajc design


in my reading around in the blogosphere, i notice that resin is often mentioned as something that people have purchased but not tried... if this applies to you, i encourage you to give it a go... visit www.iceresin.com to learn about it... go to youtube and look for instructional videos by susan lenart kazmer and her team... it runs about $24 for the kit...

so go ahead and play!

and don't forget to enter april's call to create - inspired by your favorite song...


A perfect accessory for my little niece from Ruffles and Stuff

Hi everyone!

I've been checking out the net for an accessory that I can use for a wedding, something easy to make and super less expensive. I have a 5-year old niece, my cousin’s daughter and she’s very dear to me. She’s a flower girl at a wedding this coming April and her mom came to me, asking help if I can make an accessory for her little girl. The mom knows that I know how to make jewelry and she wanted something real cheap because they’ve already spent money for the gown. My niece is a favorite at weddings and since three she’s been attending weddings every year. She’s a cute little girl when she’s in her gown. Mom was requesting something her girl can wear every wedding so that she won’t have to buy every year.


So, I went over to Ruffles and Stuff because I know Disney has a lot of these stuffs “,)


Here’s what I’m going to make. I plan to make it in different colors so that my little niece has the colors for every wedding motif. What do you think? This will look good on little girls, too!


I think this rose cuff bracelet will look really, really cute on her. I even wanted one for myself.


...and these earrings, too! Just a few adjustments on the size and I know, both the earrings and rose cuff will perfectly look good on my little niece.


If you're looking for a wedding accessory, or maybe, not just for weddings but something you feel like wearing, you can always try out and visit these two pretty easy tutorials from Disney, her Rose Cuff Bracelet and Petal Earring Tutorial.


If you like bead weaving with pearls, check out TrinketsnTomes' Pearls Three Ways Bracelet Tutorial.


If TrinketnTomes' tutorial is a bit difficult for you, here's something super easy from Karla Schafer of Auntie's Beads, the Karla Kam Pearl Knotting video tutorial, great for beginners and easy project!


Have fun!!!


Download lots of free jewelry making tutorials at DiyLessons! Are you a jewelry (jewellery) making teacher/ tutor? You can also list your tutorials here too.Don't miss a post! Subscribe to Handmade Jewelry Club by Email FREE